Technical Walkthrough: Post-LIVE Monitoring, Financials, and Project Activity
Once a project is officially LIVE on the impactOne platform, the Partner (Maker) and the Funder/CSR Team (Checker) must transition into the active monitoring and financial management phase. This workflow ensures real-time visibility into resource utilization, risk mitigation, and goal achievement.
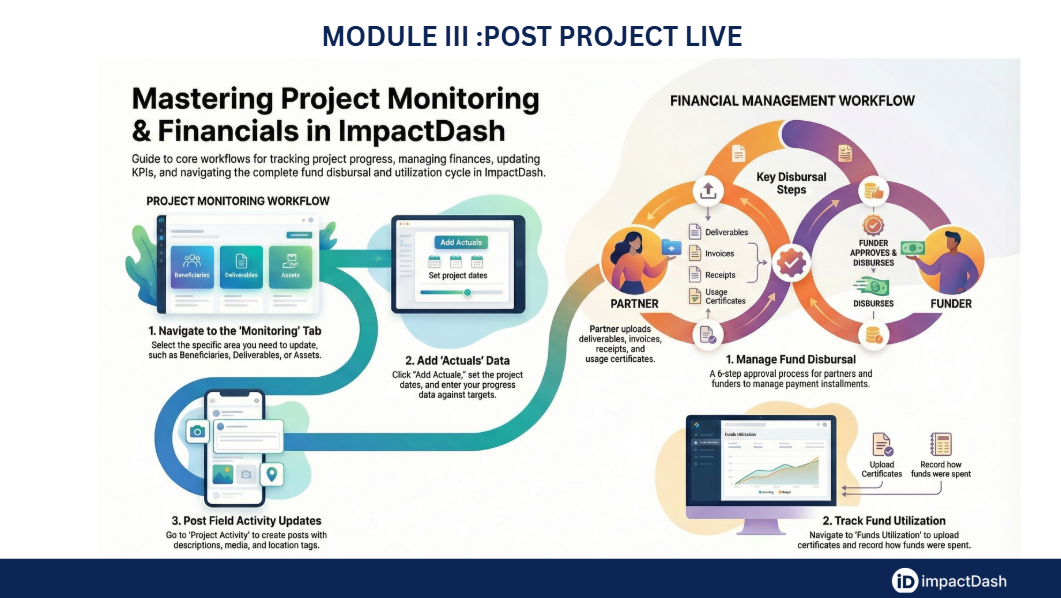
Phase 1: Performance Monitoring (Maker)
In this phase, the Maker records actual progress against the targets established during project mapping.
• Beneficiaries and Deliverables: Navigate to the Monitoring tab. Select the Financial Year and click “Add Actuals”. You must set the specific project start and end dates before entering the actual quantities achieved against each target. For deliverables, upload supporting documents for each line item before clicking "Add" to finalize the entry.
• Indicators (Outcome, Impact, and SDG): Select the Indicators or SDG Indicators sub-tabs. Click the pencil icon next to a line item to initiate editing. Enter the actual values (Distribution), upload any required audio, video, or document evidence, and provide remarks before saving.
Phase 2: Asset and Financial Tracking (Maker)
• Asset Mapping: Navigate to the Assets section under Monitoring. Click “Add Asset” to record resources like equipment or infrastructure. You must enter the asset name, type, creation date, cost, and registered owner, and upload a photo of the asset.
• Financial Monitoring: This involves systematic tracking of expenditures. Under the Financial Monitoring sub-tab, select the financial year and use the pencil icon to edit specific line items (e.g., construction costs or salaries). Enter the Actual value spent against the target for that period and click “Save”.
Phase 3: Project Activity Reporting (Maker)
This phase serves as a "field diary" to document ongoing activities for stakeholders.
• Creating Field Posts: Navigate to the Project Activity tab. Click the pencil icon next to “Create a Post” to begin.
• Activity Details: Select the Activity Type (e.g., Volunteering, Site Visit, Inauguration) from the dropdown menu. Provide a brief description and enhance the post by adding geo-tagged locations, media (photos/videos), and documents. Click “Post” to publish the update to the dashboard.
Phase 4: The 6-Step Funds Disbursal Lifecycle (Maker & Checker)
This is a critical workflow where the Maker initiates payment requests and the Checker approves them.
• Initiation: Navigate to Financials > Funds Disbursal. Click the Financials icon on the specific installment and select “Add Payment” to request either a partial or 100% disbursal.
• The Disbursal Steps:
1. Deliverables: Maker uploads evidence of work completed, adds the submission date, and sends for approval.
2. Invoices: Maker uploads a scanned copy of the invoice and enters courier details for the hard copy.
3. Approval (Checker): Steps 3 and 4 are performed by the funder/checker to approve the advice and disburse the payment.
4. Acknowledgement (Maker): Once the payment is received, the Maker uploads the Payment Receipt and Bank Advice, entering the bank name and amount received.
5. Usage Certificate: The Maker uploads the Tranche Utilization Certificate and clicks “Complete” to finalize the installment cycle.
Phase 5: Funds Utilization and Exit (Checker focus)
The final phase focuses on the annual reconciliation of funds.
• Funds Utilization: Navigate to Financials > Funds Utilization. The system auto-populates the "Total Utilized" column based on the data entered in Financial Monitoring.
• Verification: The Checker (or Maker) uploads the Annual Utilization Certificate. The Checker then manually enters the utilized amount by Source Category. The system automatically calculates any Unutilized Amount.
• Project Exit: Navigate to Exit Indicators under Monitoring. Here, the Maker and Checker assess if the project has met its objectives and is ready for formal closure.